After visiting the prized beehives of other community gardens, we began to dream of the day Q Gardens might have its own buzzing hives. Could we pull it off despite having no members with substantial beekeeping experience? Gradually a plan took shape: we would design our own apprenticeship program to train Q Gardeners—and other interested community members—to keep bees.
Fast-forward two years and we are the proud keepers of two community beehives!
As a way to share our approach and inspire others, here is a summary of the major steps we took to get our beekeeping project off the ground:
- Make sure there is sufficient interest among your group members. To gauge interest, we sent an email to our garden listserv introducing the idea of starting a bee project and asking for people’s thoughts. The answer was a resounding YES, people wanted to learn about bees!
- Find a location for the hive(s). There are beehives in backyards, community gardens, and rooftops all over New York City. Here are some parameters to keep in mind as you consider possible locations. In our case, we hoped to have our hives located within Q Gardens itself. However, given its proximity to a busy sidewalk and feral cat colony, this was not feasible. We went on to approach the owners of several nearby buildings until we found one open to the idea of letting us put hives on the roof. In a lucky twist of faith, the manager of one of the buildings we approached has a father who keeps bees in Turkey! He was immediately enthusiastic, and has been 100% supportive of the project ever since.It may seem daunting to find a location for your hive(s), but spread the word and remember: you never know until you ask!
- Get local buy-in. You are likely to have neighbors who are skeptical or even fearful of your beekeeping plan. Here is the information that we shared with people to ease their worries:
Since beekeeping became legal in NYC in 2010, it has become increasingly popular, with hives situated throughout NYC’s five boroughs in backyards, on balconies, in community gardens, and on both residential and commercial rooftops. The Waldorf Astoria has a half dozen rooftop hives and even schools, such as York Prep on the Upper West Side, are keeping bees.
- Honeybees make great neighbors. They are quiet and among the tidiest creatures alive. Honeybees’ entire purpose is to be productive and loyal to their hive and queen, so they will not stray except when going out to forage for pollen.
- A hive fully loaded with honey weighs about 100 pounds, which can be placed on a wooden pallet that spreads the weight over approx. 12 square feet.
- An average hive can produce a surplus of 20–50 pounds of honey per season, depending on the maturity of the hive and the season’s nectar flow.
- NYC requires that they have a notice on file of the address for the hive, but no permit is needed. There are no other requirements, but the City reserves the right to move the hive if it becomes a nuisance.
- If any problem occurs, the hive can be donated to a local farm or another community garden.
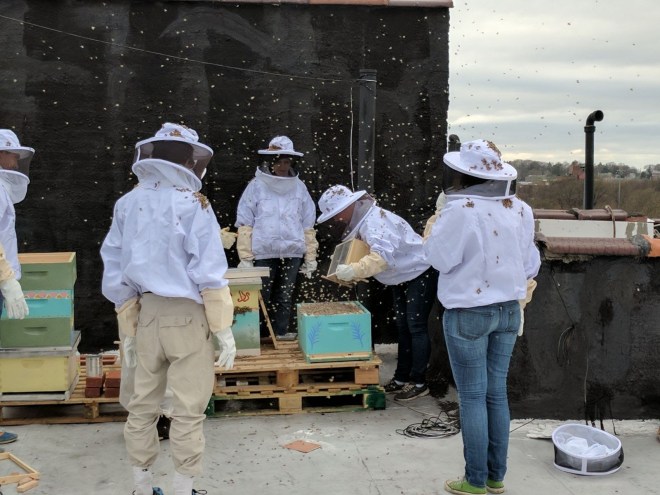
- Below is a picture of Q Gardens’ hives, located on the rooftop of a residential building in Flatbush, Brooklyn.

- Get funding. There are many sources of funding for community-based projects in New York City! In our case, we got a $1,200 grant from Citizens Committee of New York City. Here is what we spent in early 2017 to set up our two beehives:
| Item | Unit Cost | # of Units | Total Cost | Source |
| Bee packages (yes, packages of live bees!) | $150 | 2 | $300 | Andrew’s Honey |
| Unassembled complete hive kit with foundation – 10 Frame 9 5/8″ | $97.25 | 2 | $194.50 | Mann Lake |
| Unassembled super kit with foundation – 10 Frame 6 5/8″ | $41.95 | 2 | $83.90 | Mann Lake |
| Unassembled, commercial grade supers – 10 frame 6 5/8″ | $13.95 | 2 | $27.90 | Mann Lake |
| 10-pack of unassembled shallow frames – 6 1/4″ | $13.50 | 2 | $27.00 | Mann Lake |
| 10-pack of waxed Rite-Cell foundation | $12.50 | 2 | $25.00 | Mann Lake |
| Jackets with hats and veils | $69.66 | 6 | $418.50 | Mann Lake |
| Leather gloves | $12.95 | 6 | $77.70 | Mann Lake |
| Smoker | $38.95 | 1 | $38.95 | Mann Lake |
| Hive tool | $6.95 | 1 | $6.95 | Mann Lake |
| Sugar (for feed) | 10 | 1 | 10 | Grocery store |
| Powdered sugar (to pour on bees during installation and mite checks) | $2 | 1 | $2 | Grocery store |
| Mite Away Quick Strips, 2 treatments | $14.5 | 3 packs of 2 | $43.50 | Mann Lake |
| Metal trash cans (with lids) to store our bee suits and equipment on the roof | $19.98 | 2 | $39.96 | Loewe’s |
| Rust-oleum paint + primer spray (for painting exterior of hives) | $7 | 6 | $40 | Home Depot |
| Total | $1,336 |
5. Find a local, experienced beekeeper to guide the project. Use your existing networks to spread the word. We posted a notice on our website, Facebook page, and garden fence saying that we were looking for an experienced beekeeper to guide us as we started a community beekeeping project. An initial lead didn’t pan out, but we struck gold when we found a committed, experienced beekeeper to act as our lead bee teacher, as well as a newer beekeeper to act as teaching assistant!
6. Decide how the experienced beekeeper will teach others. There are many ways to teach and learn; schedule a meeting to discuss what approach will work best for your group. The beauty of a community beehive is that there are constant opportunities for hands-on learning. Think of ways to maximize these opportunities for everyone in the group. In our case, we planned to recruit an initial cohort of apprentices who would meet regularly throughout 2017 for classes and hive checks. We developed a simple application, which was primarily intended to ensure applicants could commit to participating for the full year. We planned for an initial cohort of six apprentices, but got 12 applications and decided to accept all 12!
7. Order the materials. We ordered our materials from Mann Lake and our bee packages from Andrew’s Honey. We had a good experience with both companies. Other reputable companies for buying hives and equipment are Brushy Mountain and Dadant. Remember to order your bee packages as early as December, as suppliers sometimes sell out!
8. Build and paint your hives! If you ordered unassembled hives, which is the cheapest option, schedule a day for your group to get together and assemble the frames and boxes. We recommend using wood glue in addition to nails when assembling. Once assembled, the outside of the hives should be painted with exterior primer and paint to protect the wood from the elements.
9. Install your bees Once your bees arrive, it’s time to install them in their new home! Here is a video that shows you how.
10. Develop a schedule for your hive checks and classes. Work with your group to develop a tentative schedule for the year. The calendar we developed is included at the end of this post as an example.
11. Decide how your group will communicate between classes and hive checks. Not everyone will be at every hive check, so think of ways to document the status of your hives and share this information across the whole group. We found it helpful to start a new listserv for the bee project and also created a shared, online folder for saving key documents and resources related to the project. At each hive check, one person volunteers to take notes and then logs key observations (such as the weather that day, hive temperament, honey and pollen stores, etc.) in a shared Google spreadsheet saved to our shared drive.
12. Be flexible, solicit feedback, and adjust your plan as needed. Every community project is a work in progress, especially when it involves caring for living creatures! There is a large beekeeping community in NYC. Don’t hesitate to reach out to other local groups for assistance.
The largest local beekeeping group is the New York City Beekeepers Association. You can also reach out to Q Gardens at qgardensinfo@gmail.com for advice and support!
Example Bee Apprenticeship Calendar:
| Date | Topic |
| March 18 | Class: • Intro to beekeeping and hive construction • Equipment overview • The honeybee castes • The beekeeper’s year • Prep for hive install |
| April 15 | Pick-up bees and install them in hives; feed them with sugar water |
| April 30 | Hive check, looking for signs of healthy development, and feed if necessary
Discuss: |
| May 14 | Class (no hive check): • Macro-level honeybee development, from queen to swarm • Swarming behavior, splits, and requeening |
| May 27 | Hive check |
| June 11 | Hive check and class: • Pesticides • Feeding bees • Pollen and nectar flow throughout the year |
| July 1 | Hive Check |
| July 14 | Hive check (including check for varroa mites) |
| July 29 | Class (no hive check): • The death period • Brood diseases, emphasizing varroa mites |
| August 5 | Hive check (including check for varroa mites); feed if necessary |
| August 19 | Class (no hive check): • Fall preparation • Brood diseases |
| September 2 | Hive check; feed if necessary |
| September 16 | Class (no hive check): • How to keep bees in NYC: paperwork, logistics, suppliers |
| September 30 | Hive check |
| October 14 | Hive check |
| October 28 | Class: • Prep hives for winter • Bees and climate change |
| December 21 | Potential winter solstice check and mite control |
**Follow the progress of Q Gardens’ community beekeeping project here and on Instagram (@q_gardens and #qgardensbees).**
Download this blog post as a PDF

Very helpful guide! Congratulations Q Gardeners.
Ena K.
Tranquility Farm